I currently have a 2006 MacBook (Polycarbonate) for school and travel, and since it's the base model, it only came with a 60GB hard disk drive. — It was time for an upgrade! 🔧
DISCLAIMER: I'm not responsible for any damage to you or your MacBook! Be sure to unplug it before continuing if you choose to do so. ⚡️
For this installation, as a minimum you'll need:
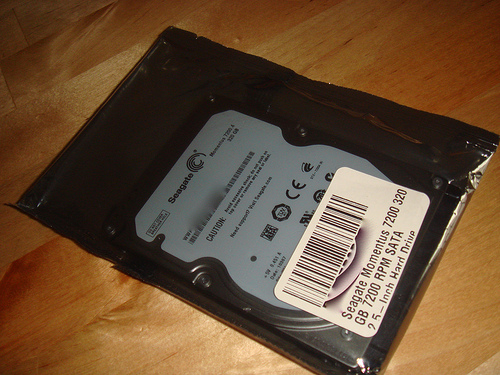
- A replacement, working, compatible 2.5-inch hard disk drive (HDD) for your MacBook. (Amazon had a 320GB 7200RPM Seagate HDD for about $60 USD, so I personally went with that.)
- A Torx T8 screwdriver.
- A small flathead screwdriver. (These have the “-” shaped head.)
… You'll also need another Mac that has enough disk-space to hold a single file that's as large as your current MacBook's drive if you want to migrate the data in its exact current state.
Making a disk image of your current HDD's data
Unless you plan on reinstalling Mac OS X and recovering your data separately, you should make a backup image of your MacBook's existing drive.
One way of doing this is using an additional, external hard disk drive (with enough space, of course) and a program called SuperDuper, but I personally chose to use “Target Disk Mode” and another Mac. (as explained below)
Connecting via “Target Disk Mode”
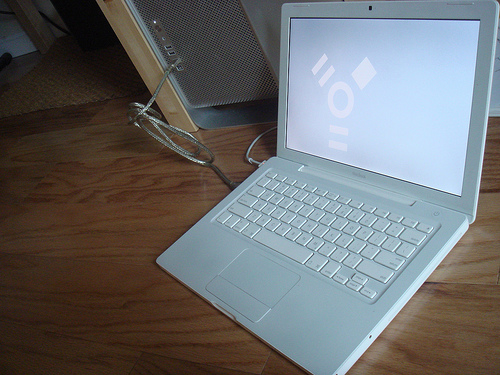
“Target Disk Mode” allows you to mount one Mac's hard disk drive on the desktop of another, just like an external drive or CD. — All you need is a Firewire cable to connect the two machines together!
So, with the two computers connected via a Firewire cable and my MacBook powered off, I booted it again while holding down the “T” key on its keyboard. — After a few seconds, the MacBook's hard disk drive appeared on my other Mac. …Love this feature! 👍🏻
Some of the new MacBooks don't have Firewire ports anymore, so unfortunately this may not work for yours. 😕
Imaging the disk with “Disk Utility”
On the other Mac, you should perform the following steps to create an image of the disk:
- Open the Disk Utility application found in the “Utilities” folder inside your Mac's “Applications” folder.
- Select your MacBook's hard disk drive from the list of drives. (Be sure to choose the right drive!)
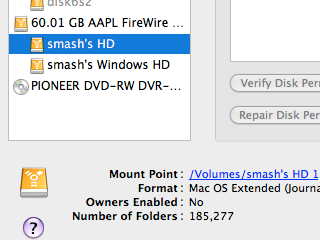
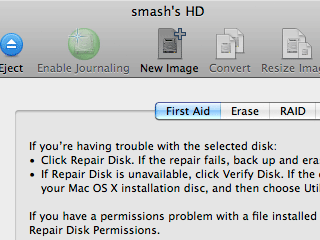
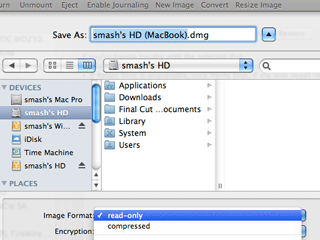
- With the drive selected, click the “New Image” button in the toolbar. This will initiate the process of creating a replica image of the MacBook's drive as a file on this Mac. (You can and probably should select the “read-only” image format, while leaving the other options alone.)
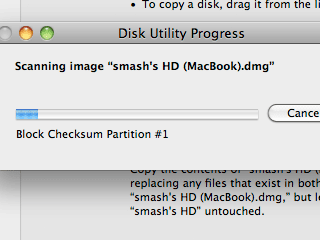
- Ensure that both Macs are in a safe position for the next hour or more, and hit “Create” to start!
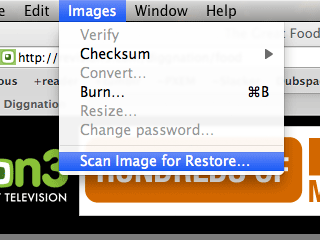
- Once this has completed, you should now have a freshly created disk image of your MacBook's hard drive as a backup! Run the “Scan Image For Restore” operation from the “Images” menu on the newly created image so that it can be used for restoring the new drive later. 👍🏻
… That was easy! 😅
Swapping out the actual drive
On this particular MacBook, all you need to do is remove the battery (and unplug the power cord!), then remove the metal shield that runs along the top-edge of the battery compartment.
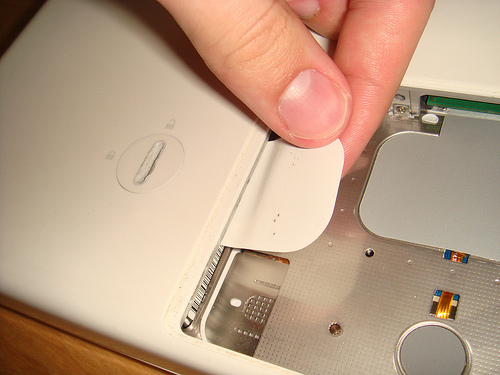
This gives you access to a white plastic tab, that can be lifted out and carefully pulled on to remove the hard disk drive's tray.
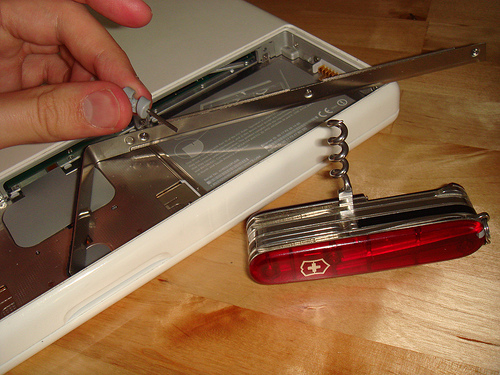
… Here's the white plastic tab, which you can carefully pull to remove the drive:

Once the tray is removed:
- Use the Torx T8 screwdriver to separate the old drive from the tray itself.
- Install the replacement drive in its place.
- Repeat all of the steps above in reverse order to reassemble and test the machine.
… Done! Except, the machine doesn't have any data back on it yet! 😅
Set the old hard disk drive aside to keep as an extra backup for now, but you can always erase this and install it into an external enclosure later on for extra storage. 😉
Re-imaging the replacement drive using “Target Disk Mode” again
Repeat the steps above to get access to “Target Disk Mode” on your other Mac again.
Since the new replacement drive is empty and probably unformatted, it shouldn't show up on the Desktop yet, but it should appear in the Disk Utility application again… which we'll use to restore the data:
- Highlight the new replacement drive for the MacBook (not the disk image you created) in Disk Utility, and select the “Partition” tab on the right side. (Again, be sure that you've selected the correct drive here, or you could destroy data accidentally!) 😱
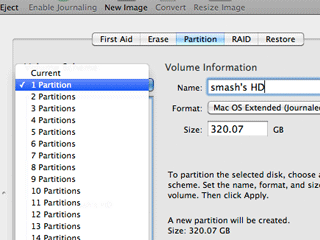
- Configure the following settings for the replacement drive's partition table, then click “Apply” to initialize the new drive:
- Choose “1 Partition” from the left-hand side.
- Set a name of whatever you'd like, but it's typically “Macintosh HD” by default.
- Leave the format and size alone.
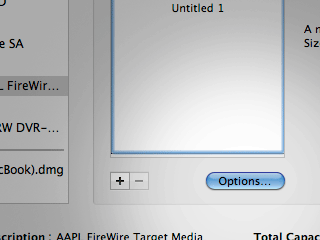
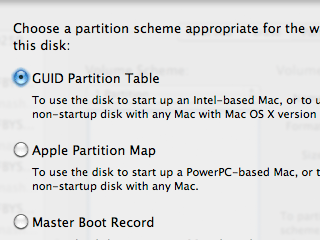
- At the bottom, choose the “Options” button and be sure that the “GUID Partition Table” type is selected.
- Hopefully by now, it has finished the “Scan Image For Restore” operation that we started earlier after creating the image of the old drive. — Go to the “Restore” tab in Disk Utility, and configure the following settings:
- For “Source”, choose the image you created earlier of the original drive. (You may be able to drag it from the left-hand column if it's still there.)
- For “Destination”, drag the new replacement drive from the left-hand column into the white box. (Again, be sure that you've selected the correct drive here, or you could destroy data accidentally!) 😱
- You can uncheck the “Erase destination” option, since we've already erased the new replacement drive.
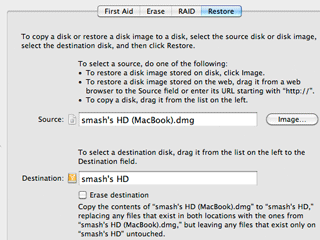
- Ensure that both Macs are in a safe position for the next hour or more, and hit “Restore” to start!
… And then, we wait. 🐌
Once the restore has completed, eject and reboot!
When Disk Utility has finished, complete these final steps:
- Hit the “Eject” button at the top of Disk Utility for your MacBook's replacement drive. ⏏️
- Once the replacement drive disappears completely from the other Mac in Disk Utility, wait 30-seconds or so. (to be extra safe)
- Unplug the Firewire cable, and power down the MacBook.
- Turn the MacBook back on while holding the “Option (⌥)” key on its keyboard, and choose the new replacement drive from the list to boot from it.
- Once booted, go to “System Preferences” and then “Startup Disk” to ensure that the new replacement drive is selected as default. ✅
… And, that should be it! — Your MacBook should be in the state it was in before, but hopefully with a lot more disk-space now. 🙂